CG Generalist | Character Designer
Project 2 - Animated Movie Environment
For this project, we were assigned groups to recreate a scene from an animated film. In addition, we were to add a natural phenomenon to the scene and animate it. The final product would be a 5-second animated scene. I worked with team members Kyle Rively, Neal Pizzini, and Celina Schuster.
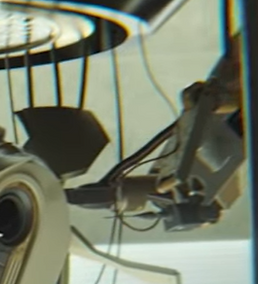
We first started by discussing the scene we were going to recreate in our Discord group chat. Each of us sent a few images in the group of scenes we could possibly consider, and after some feedback from our mentor Kelly Burroughs, we ended up choosing this scene from the Netflix movie Next Gen.

Later, we met up again through Discord and Kelly helped us create a bid sheet so that we could organize our assets and decide on what everyone was going to work on. We later added onto it to accommodate for the texturing and effects. I was assigned the machines in the background that were holding the robot parts, Kyle was in charge of the room and camera setup, as well as some of the wires, Neal was to model the robot body and arm, and Celina was responsible for the remaining smaller props like the control panel and lamp.
.png)
We all individually started working on our respective models. I started with the bottom support of the robot since it was the simplest to model. It was basically just a cube with a few extrusions, a long prism with slightly rounded edges on top, and some cylinders. After putting all the pieces together and comparing them with the reference, I added in the edge loops to finalize the model. Finally, I UV unwrapped each piece and then combined them to make one mesh at the end.

.png)
.png)
Next, I started working on the top support of the robot. This object was a little difficult to figure out how to model since it was too small to see clearly, but at the same time, I tried not to spend too much time on it. In order to make sure the scaling of everything was correct, I set up a camera with the reference image behind it so I could line up my model. Everything was made using polygons, save for the wires and the drill piece which were created using NURBS. Again, after modeling, I finalized with the edge loops and unwrapped each piece individually before combining the whole thing.
.png)
.png)
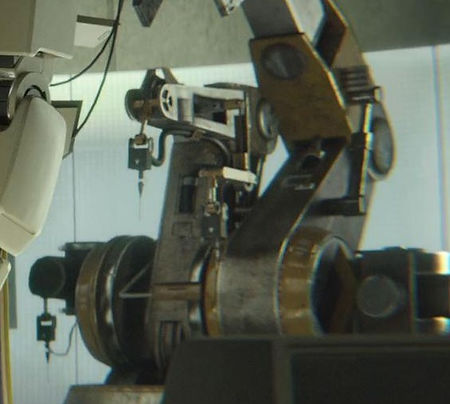
Lastly, I began to model the machine in the background. Since this model was quite big and complex, I split it into its left, middle, and right sections. I also set up a camera for this one to make sure the scaling was correct. I first began with the middle machine.
After creating the base, I began making one side of the machine. I started with the foot and then modeled the two circular shapes. After I got them how I wanted, I created a flipped, duplicate version. Then, I modeled the middle pieces and centered them. Finally, I made sure everything was scaled properly by lining them up with the camera.
Next, I started modeling the side arm. Since most of it was obstructed by the robot, I found another screenshot from the movie to use as a reference and get a better idea of how the machines were supposed to look.
.png)
.png)
Lastly, I ended up having to remake the inner circle of the left side to have the square hole in it. I then finished the rest of the small details like the wire and the bar in the front. After this, I had finished the middle portion of the machine.
.png)
.png)
Then, I moved on to the left portion of the machine. Some of the shapes were similar to the model I had just made, so it was easier to figure out how to model this. I started with the first arm section by modeling it in the middle so I could align the details easier. Next, I moved it into position lined up with the reference and adjusted the scaling. I then did the same for the second part of the arm. Finally, the left portion was complete.
.png)
.png)
.png)
Lastly, I modeled the right portion of the machine. This one was very quick and simple to model. With the same extra reference I used before, I was able to model the object to how it would most likely look if it was not obstructed from view. I started by shaping a cube for the inner black portion, then the outer metal portion. Finally, I added the big bolts on the middle, top, and side.
.png)
.png)
Now that the last portion of the machine was complete, I added any other details I had forgotten. Then I UV unwrapped and combined each portion. Finally, the whole machine was complete.
.png)
.png)
.png)
.png)
Next, it was time to move on to texturing. I textured everything using 3D Coat.
For the bottom support, I used the paint bucket tool and adjusted the metalness and roughness based on the area I was painting. I did not use any smart materials since this object is not very detailed in the actual scene. I then took the textures into Renderman to see how they would look.
.png)

For the top support, I did the same as the bottom support using the basic bucket tool. This object is especially unclear and small in the scene. I then transferred the textures to Renderman to make sure they looked how I wanted.
.png)

Lastly, I began to texture the machine parts. For the middle portion, I used the paint bucket tool for the base and sides, adjusting for the metalness and roughness. Then, for the main metal body and the side arm, I used a smart material for steel and adjusted it to match the color and texture of the reference. Next, I brushed on a smart material for dirt over some of the yellow parts. Finally, I used a brush with depth to paint on the bolts on the rim of the yellow sides.
.png)

Next, I textured the right portion mostly with the paint bucket tool and then painted on some smart material dirt over the metal part. Finally, I textured the left portion similarly to the right middle using the same smart materials and dirt.
.png)

.png)
Now, the machine's textures were completed.

Soon, Kyle and Celina had finished texturing their models while Neal worked on the spark effects. Once everyone had completed their assets, Kyle and Neal imported everything into the scene in the pipeline. Kyle then set up the lighting. After reconnecting the textures to each model, we made some renders to see how everything was coming along. We each went into the studio on our own times to make tweaks to the scene, until soon, everything was finalized. We rendered the scene and Celina composited using Nuke and After Effects. Finally, the final product came out to look like this: