CG Generalist | Character Designer
Project 1 - Live Action Set Extension
The goal of this project was to recreate a black and white movie scene. Models were to be created using NURBS and combined with a live-action background. Finally, it would be rendered in B/W to recreate the original chosen image.
I started by looking for a scene to recreate on film-grab.com, a website that compiles screenshots of various movies. I ended up choosing a scene from the 1940 movie, Rebecca, shown to the right.

Before starting any modeling for the project, I spent quite a bit of time watching videos on how to use NURBS in both Maya and Houdini so that I could
decide which software to use and familiarize myself with NURBS modeling techniques. I decided on working in Maya since I was much more familiar with its interface, although I hope to learn Houdini for future projects.
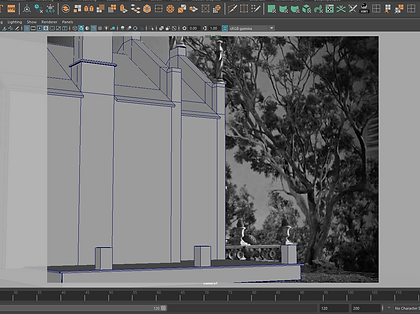
I first started out by matching the camera to the picture in Maya. It definitely took up more time than it should have, but at least I could make sure my models were exactly to scale. I then began to roughly white-box the scene in polygons to ensure the camera was at the right angle.
.png)
.png)
Then, after seeing some of my classmates model in polygons and then convert them to NURBS, I decided that it would be most efficient to model the more rectangular objects using this method. I used the model of the porch that I had already made as a guinea pig to confirm if the method would work. First, I created edge loops where there were sharp corners and edges so they would not get smoothed out. Then, I converted it from polygons to subdivisions and then from subdivisions to NURBS. The conversion worked perfectly and after reapplying a texture, I came out with this:
.png)
I began to refine the house model for conversion, making a hole for the doorway, creating a space for the window, extruding the bottom of the house to match the reference, and finally adding edge loops around the sharp areas. Then, I modeled the window frame and the roof separately.
.png)
I tried to create the crown molding that wraps around the house using NURBS, but I was having trouble at first since I could not get the CV curve to make a sharp turn. After watching a couple of videos on YouTube, I finally came across one that showed me how to make CV curves more linear. Learning how to do so helped me be able to model more rectangular things in NURBS instead of having to convert from polygons. I was then able to create the molding by extruding a profile curve I had drawn along the linear curve.
.png)
.png)
Next, I began experimenting on how to create a shape for the roof shingles. I first tried drawing the outline of the shape with a CV curve and then creating a plane with it. However, I did not want it to be completely flat, so I tried a different method. I drew the shape with curves again, but this time I duplicated it, lofted them, and then made each curve a plane to close the shape. After deciding on this method, I made the final model and placed it over the roof platform I already had.
.png)
.png)
The next thing I did was apply the same steps to the other side of the house. I also duplicated the molding and roof shingles and changed them so they would be slightly different.
.png)
My next step was figuring out how to create the arched window. I decided to use NURBS this time instead of polygons like I did for the other window. I started looking for tutorials on YouTube on ways to cut the arch shape out and I came across a video about the trim tool. It took me a little while to get the hang of it since I had never used live surfaces before, but after a bit of experimenting I was able to apply it to the window.
Before starting the arches, I made the frame of the window using a rectangle curve the size of the gap I had made and extruded a profile across it. Then, I made the bars in between the arches using the same method. Finally, I began to do the arches. I first created a NURBS surface and fitted it to the size of one of the small sections on the top. I then drew an arch shape on the surface with a CV curve and then cut it out using the trim tool. Using the same curve and a scaled-down version of the profile curve I used earlier, I created a border for the arch. This completed one small arch which I duplicated and scaled for the rest of the arches.

.png)
.png)
.png)
Finally, to complete the window, I created the bars that intersect the arches using the same extrusion technique.
.png)
The next thing I tried to do was create the design on the side of the window. I tried a few different ways to replicate it using the trim tool, but it was proving to be quite a challenge for me. At first, I created a seperate NURBS plane, trimmed the shapes to look like the design, and then duplicated the curves and lofted them. This method turned out to be a little messy since there were so many curves, and it did not look good when I placed it on the model. I decided I would try again but directly on the

.png)
surface of the house this time. I tried drawing the same shapes as the first time, and then trimming all of them at once. However, when I used the trim tool, it was apparently too much for my laptop to handle so Maya crashed.
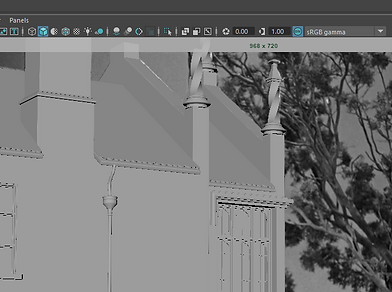
Feeling a little discouraged since I had spent a while trying to create that part of the house, I decided to just come back to it another time and try a different method. The circle I had drawn did not turn out so nice, anyways. I moved on to some of the easier things like the crown molding on top of the window and the pipe on the side of the house, both of which I made using extrusions along curves.
.png)
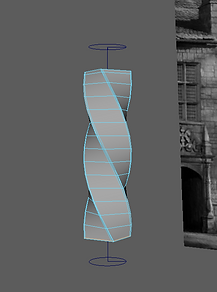
Next, I decided to make the decorations on top of the house. This part was also fairly simple as it was just more extrusions and revolutions. For the top part, I extruded a profile curve around a square-shaped curve and for the base I revolved another profile curve around the center. The middle, however was different. I twisted a polygon cube using the twist deformer and converted it from polygons to NURBS. I felt that this was the most efficient way to do it. After I had made one, I duplicated the needed parts for the rest of them.
.png)
.png)
.png)
The next thing I decided to do was create the parts of the fence since I figured most of it would be revolutions and extrusions. There were many parts to it, though, so it did take a good amount of time. I first started by drawing a profile curve for the blocks and
the top and bottom of the fence. I then extruded them along their respective paths and adjusted them to match the reference. Afterwards, I created the vases on top of the blocks by revolving a profile curve for the top part and extruding another profile curve around a square path for the base. Next, I started
.png)
.png)
making the circles that are in the middle. I revolved a curve for the circle itself and then rotated it to face forward. For the top and bottom shapes that connect them to the fence, I drew a profile for one, extruded it along a square curve, and then duplicated and flipped it for the other side. Then, for the sides, I decided to draw a square curve and extrude it. I made the courners a little rounded so it would not be perfectly straight or too sharp. Finally, I grouped them all together so I could duplicate them. After duplicating them and placing them on the fence, this was the final result:
.png)
.png)

Finally, it was time to recreate the entrance of the house. I started by making the pole using extrusions along a square curve for the upper and lower parts, and then a revolution for the middle. Then, I created the arch shape just like how I made the arches for the windows. Lastly, I modeled the curvy decoration above the entry. This

.png)
.png)
shape was a little complicated, so it took a few steps. First, I drew an s-shaped curve and extruded a profile curve across it. I had to play around with the surface points a little after to make it wider on the bottom. I followed the same steps for the curl on the side. Then, To make the middle shape, I extruded a profile curve around a square curve. Finally, I places a NURBS sphere on each side.
After that, I finally came back around to making the side detail of the window. I ended up deciding it would be easiest to model it in polygons and then convert to NURBS. I modeled the rectangular part from a cube and extruded the holes inwards. Then, I made the circle shapes by rounding out another cube and duplicating it. I did not want to use a cylinder to avoid triangles as it would cause problems when converting. Afterward, I converted it to NURBS and put it in its place.
Finally, all I had to do left was add in the little details. I created bushes for the vases by revolving a curve and made a set of stairs and the concrete surface in the foreground by extruding. After aligning them with the reference image, the models were finally complete!
.png)
.png)
In the middle of texturing, I decided that I wanted to take a break and do lighting instead, since I felt it would be an easier task. I started off by importing a 3-point lighting preset from Renderman. Then, I adjusted one light at a time in order to match the shadows properly. I did the harsh shadows on the roof first by moving the small, intense light. Then, I did the next shadows by adjusting the medium, less intense light. Finally, for the overall lighting of the scene, I angled the large, soft light to match the reference. This process took a lot of trial and error, but it paid off in the end.


Now, it was time to move on to texturing. I first watched a few videos about texturing with NURBS, including one my professor had posted. All I had to do was project an image onto the NURBS surface. I found a few textures online and began applying them to the models. First, I applied a brick texture to the fence blocks. After seeing how they rendered out, I decided to make different variations of the texture in Photoshop so that they would each be slightly different. I did the same for many other textures such
as the concrete and the bushes.
.png)
.png)
I wanted some of the concrete textures to be more convincing, such as the object in the foreground, so I created a height map in photoshop by adding a gray darken layer over the texture image. I then applied the color and height maps to the objects using Renderman's PxrSurface. I tried to add a height map to the bricks on the patio, but it

was too difficult as the NURBS surface would stretch the texture, and the model would not import into Substance Painter properly when I tried.
Soon, I ran into a major problem. When I was trying to texture the windowpane of the left window, I saw that the texture would get distorted on the surface. I found out this was because it was converted from polygons. I fixed it quickly by replacing them with a regular NURBS plane, but I realized I would have to fix the entire building as it was also converted from polygons.

Having to redo the whole building really set me back as it took quite a while. I spent a lot of time trying to get the edges a little round like they were before, but whenever I did, the surface would distort the texture. Unfortunately, in the end, I settled for having my edges sharper. After finally redoing the building, I applied another texture I had found online and altered. The rest of the objects were fairly simple to texture, so after I had done that, texturing was complete.

Finally, while it was rendering, I prepared to combine it with this image I had taken at a park.


Once I combined them, the recreation of the scene from Rebecca was complete!
